Setting Up the Environment for CSAPP Labs
Preface
Studying CSAPP without doing the labs is like reading the Four Great Classical Novels of China but skipping Dream of the Red Chamber. It shows a lack of depth and appreciation—you might be dazzled by fancy words, but you’ll never grasp the profound core. Without labs, you’re just scratching the surface, missing the essence, and limiting your growth to a relatively unsuccessful experience.
The biggest reason people give up on CSAPP labs? The Linux environment. Back in my undergrad days, I used VMware Workstation with Ubuntu Desktop for the labs—it was fine for me, but people around me ran into lots of issues:
- Virtual machine installation failures
- VMware incompatible with Hyper-V
- VM network issues
- Problems sharing folders between VM and host
- Setting up the Chinese input method in Ubuntu
- Various mysterious (and frustrating) issues
And let’s be honest: VM performance is often terrible. You have to split your host’s memory, and you never know if your VM or your main system will run out of memory (OOM) first.
Given all this, I switched to WSL (Windows Subsystem for Linux). If you’re on Windows 10 Version 2004 or above, or even better, Windows 11, you can use WSL 2. Anything below that only supports WSL 1, which is just a translation layer converting Linux system calls to Windows—WSL 2, on the other hand, runs a full Linux kernel inside a lightweight VM (no maintenance required!). And having a real Linux kernel is crucial for CSAPP labs.
What if you’re on macOS? If you have an Intel-based MacBook, you can use VirtualBox, VMware Fusion, or Parallels to run a Linux distro—or even Docker. But for M1 Macs? Time to switch computers (no joke, the M1 is really not suitable for these labs).
Anyway, I realize I’m getting a bit long-winded—let’s dive in!
Installing WSL and Ubuntu
Installing WSL on Windows is super straightforward. Just open an Administrator PowerShell window and run:
wsl --install -d UbuntuWindows will automatically set up all the necessary features and download the latest Ubuntu LTS (as of this post, that’s 20.04). After installation, a terminal will pop up, prompting you to set a username and password:
Installing, this may take a few minutes...
Please create a default UNIX user account. The username does not need to match your Windows username.
For more information visit: https://aka.ms/wslusers
Enter new UNIX username: shinya
New password:
Retype new password:
passwd: password updated successfully
Installation successful!
Keep in mind: when you type your password, nothing will show up—totally normal!
Once you’re set up, you’ll see a prompt like shinya@DESKTOP-4TMFLAE:~$, ready for commands. Congrats, you’re now in Ubuntu!
Some Handy Tips
Windows Terminal
Windows Terminal is, hands down, the king of terminals for Windows.
You can install it directly from the Microsoft Store, or grab the msixbundle from the GitHub Releases page and double-click to install.
If WSL and Ubuntu are already set up, you’ll see an “Ubuntu” option under the ”+” drop-down menu in the Windows Terminal title bar. Click it to launch your default Ubuntu shell instantly.
File Sharing
WSL’s Ubuntu and your Windows system each have their own filesystems—but they’re not entirely isolated.
Your Windows C drive is mounted in Ubuntu at /mnt/c. For example, to access your Windows Desktop from Linux:
$ cd /mnt/c/Users/Shinya/Desktop
$ ls
 course.py     desktop.ini     szxx.bat     szxx.txt
If you want to view files in your WSL home directory from Windows, just do:
$ cd ~
$ explorer.exe .
This opens Windows File Explorer to that directory, letting you handle files as if they were local.
Visual Studio Code
VS Code, the world’s best text editor, can open folders directly inside your WSL Ubuntu instance—making your Linux projects feel just like working with files locally. Not everyone loves doing labs in vim!
First, launch VS Code in Windows. In the Extensions marketplace, search for “WSL” and install the “Remote - WSL” plugin (should be the first result).
Then, in Ubuntu, navigate to your project folder and run:
$ code .If it’s your first time running this, VS Code will install the necessary support components:
$ code .
Installing VS Code Server for x64 (899d46d82c4c95423fb7e10e68eba52050e30ba3)
Downloading: 100%
Unpacking: 100%
VS Code will then open your Ubuntu folder as the workspace. Now you’re free to develop however you like!
Switching to Chinese Package Mirrors
First, a quick word on what a “mirror” is:
According to ancient texts, in the primordial chaos, the purest vital energy formed crystal-like “sources” brimming with life force.
Sorry, just kidding.
Basically, Ubuntu (or any Debian-based system) uses a package manager called apt which pulls packages from a list of URLs, aka sources (or “mirrors”). The default URLs usually point to overseas servers, which are slow—or might not even work—if you’re in China. So, it’s better to use a domestic mirror for faster downloads.
To do this:
$ sudo mv /etc/apt/sources.list /etc/apt/sources.list.bak
$ sudo nano /etc/apt/sources.list
Then paste in the following (these are Aliyun’s mirrors for Ubuntu 20.04; check your distro & version!):
deb http://mirrors.aliyun.com/ubuntu/ focal main restricted universe multiverse
deb-src http://mirrors.aliyun.com/ubuntu/ focal main restricted universe multiverse
deb http://mirrors.aliyun.com/ubuntu/ focal-security main restricted universe multiverse
deb-src http://mirrors.aliyun.com/ubuntu/ focal-security main restricted universe multiverse
deb http://mirrors.aliyun.com/ubuntu/ focal-updates main restricted universe multiverse
deb-src http://mirrors.aliyun.com/ubuntu/ focal-updates main restricted universe multiverse
deb http://mirrors.aliyun.com/ubuntu/ focal-proposed main restricted universe multiverse
deb-src http://mirrors.aliyun.com/ubuntu/ focal-proposed main restricted universe multiverse
deb http://mirrors.aliyun.com/ubuntu/ focal-backports main restricted universe multiverse
deb-src http://mirrors.aliyun.com/ubuntu/ focal-backports main restricted universe multiverse
Then update your package list and upgrade packages:
$ sudo apt update
$ sudo apt upgrade
Installing Software for the Labs
Required Packages
It’s this simple:
$ sudo apt install build-essential gcc-multilib gdbOptionally, you can install cgdb, a lightweight front-end for GDB, which provides split screen windows for the command interface and the source code. The package in the official repos isn’t the newest, so here’s how to compile it from source:
$ sudo apt install automake libncurses5-dev flex texinfo libreadline-dev
$ git clone git://github.com/cgdb/cgdb.git
$ cd cgdb
$ ./autogen.sh
$ ./configure --prefix=/usr/local
$ make
$ sudo make install
Once it’s installed, you can launch cgdb from any directory:
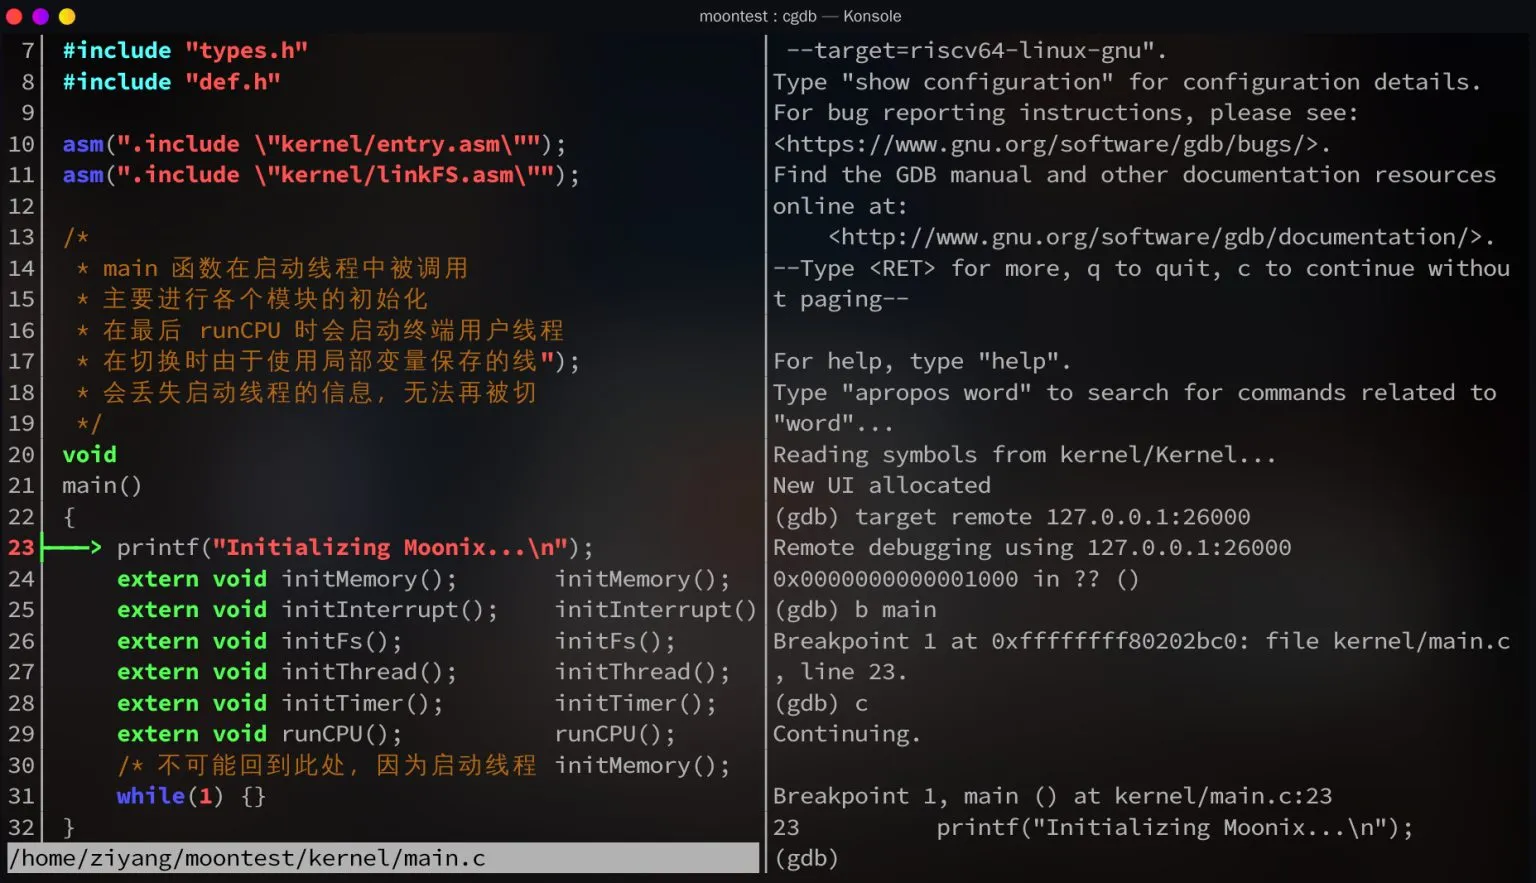
The left window shows your code, and the right shows gdb.
By default, the windows are stacked vertically; press ctrl+w to toggle to horizontal split.
Press esc to focus the code window (browse through the code and set breakpoints with spacebar).
Press i to return focus to the gdb window (where commands work just like vanilla gdb).
For more, check out the full CGDB Chinese Manual.
Where to Find the Labs
If you’re self-studying CSAPP, check out this site: http://csapp.cs.cmu.edu/3e/labs.html. The “Self-Study Handout” for each lab contains the downloadable materials. Transfer those into WSL—and happy experimenting!