Side Routing Solution with Debian
Preface
Most bypass router solutions are built upon OpenWRT—a dedicated Linux distribution with its own package management system. Furthermore, the majority of these schemes rely on LuCI, a web GUI tailored for OpenWRT, with guides almost always referencing luci-app-xxx packages purpose-built for it. While these setups work, they aren’t perfect:
- Excessive reliance on GUI configuration: LuCI packages typically allow only limited configuration from the web interface.
- LuCI’s instability: The issue isn’t so much with OpenWRT, but with LuCI itself. My LuCI crashed three times because of OpenClash (perhaps due to something I did).
- Although you can compile OpenWRT yourself, most guides rely on prebuilt firmware that may be outdated.
- You never really have full system control (LuCI often hides details from you).
I spent a year or two tinkering with OpenWRT-based transparent proxy solutions—trying both primary and bypass router strategies—but ultimately abandoned them due to their instability. For a long while, I simply relied on all sorts of clients (Surge, Loon, Clash Verge Rev, etc.) to muddle through.
About a week ago, Zenless Zone Zero launched. Due to the issue with publishing on Chinese servers, the PS5 version is only available on international servers. Even connecting to the Asia server yielded miserable speeds and latency. Not wanting to pay for NetEase UU acceleration, I thought about transparent proxies again. Conveniently, I had a spare mini PC with Debian already installed (originally intended for development but abandoned out of laziness). So, after an experimental weekend, I finally worked out a bypass router transparent proxy using Debian.
The final network topology looks like this:
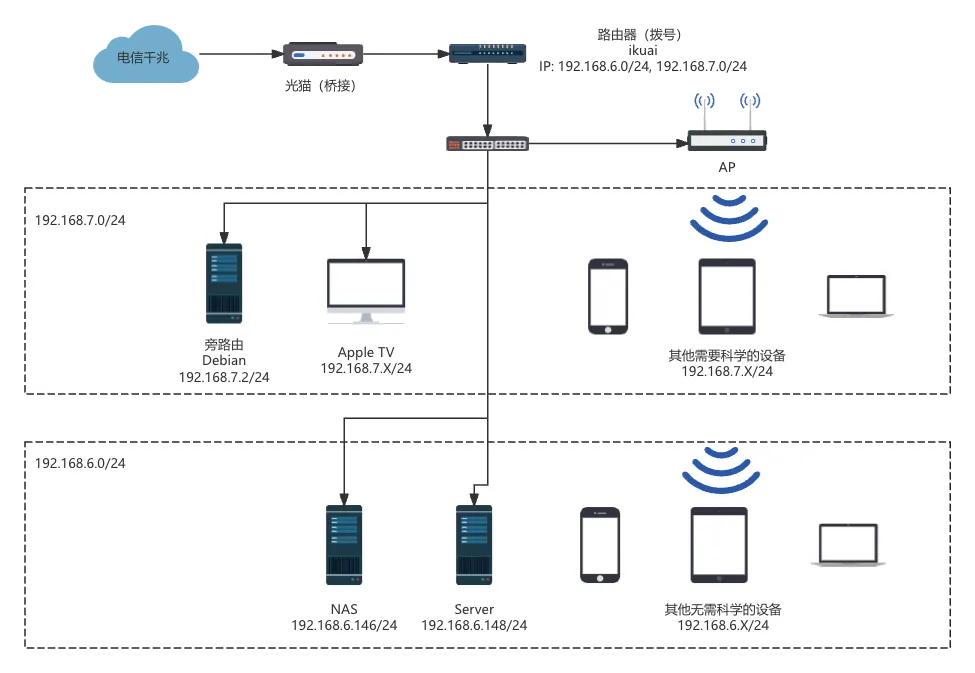
You’ll notice the internal network is divided into two subnets: 192.168.6.0/24 and 192.168.7.0/24. The 6.0/24 subnet is the default and serves devices that don’t need to bypass firewalls, while 7.0/24 is for devices that do, with all their traffic forwarded through the Debian mini PC.
The backbone of this solution is AdGuardHome + Clash. AdGuardHome handles ad filtering and related features, while Clash manages DNS-based traffic splitting and proxying.
Main Router Configuration
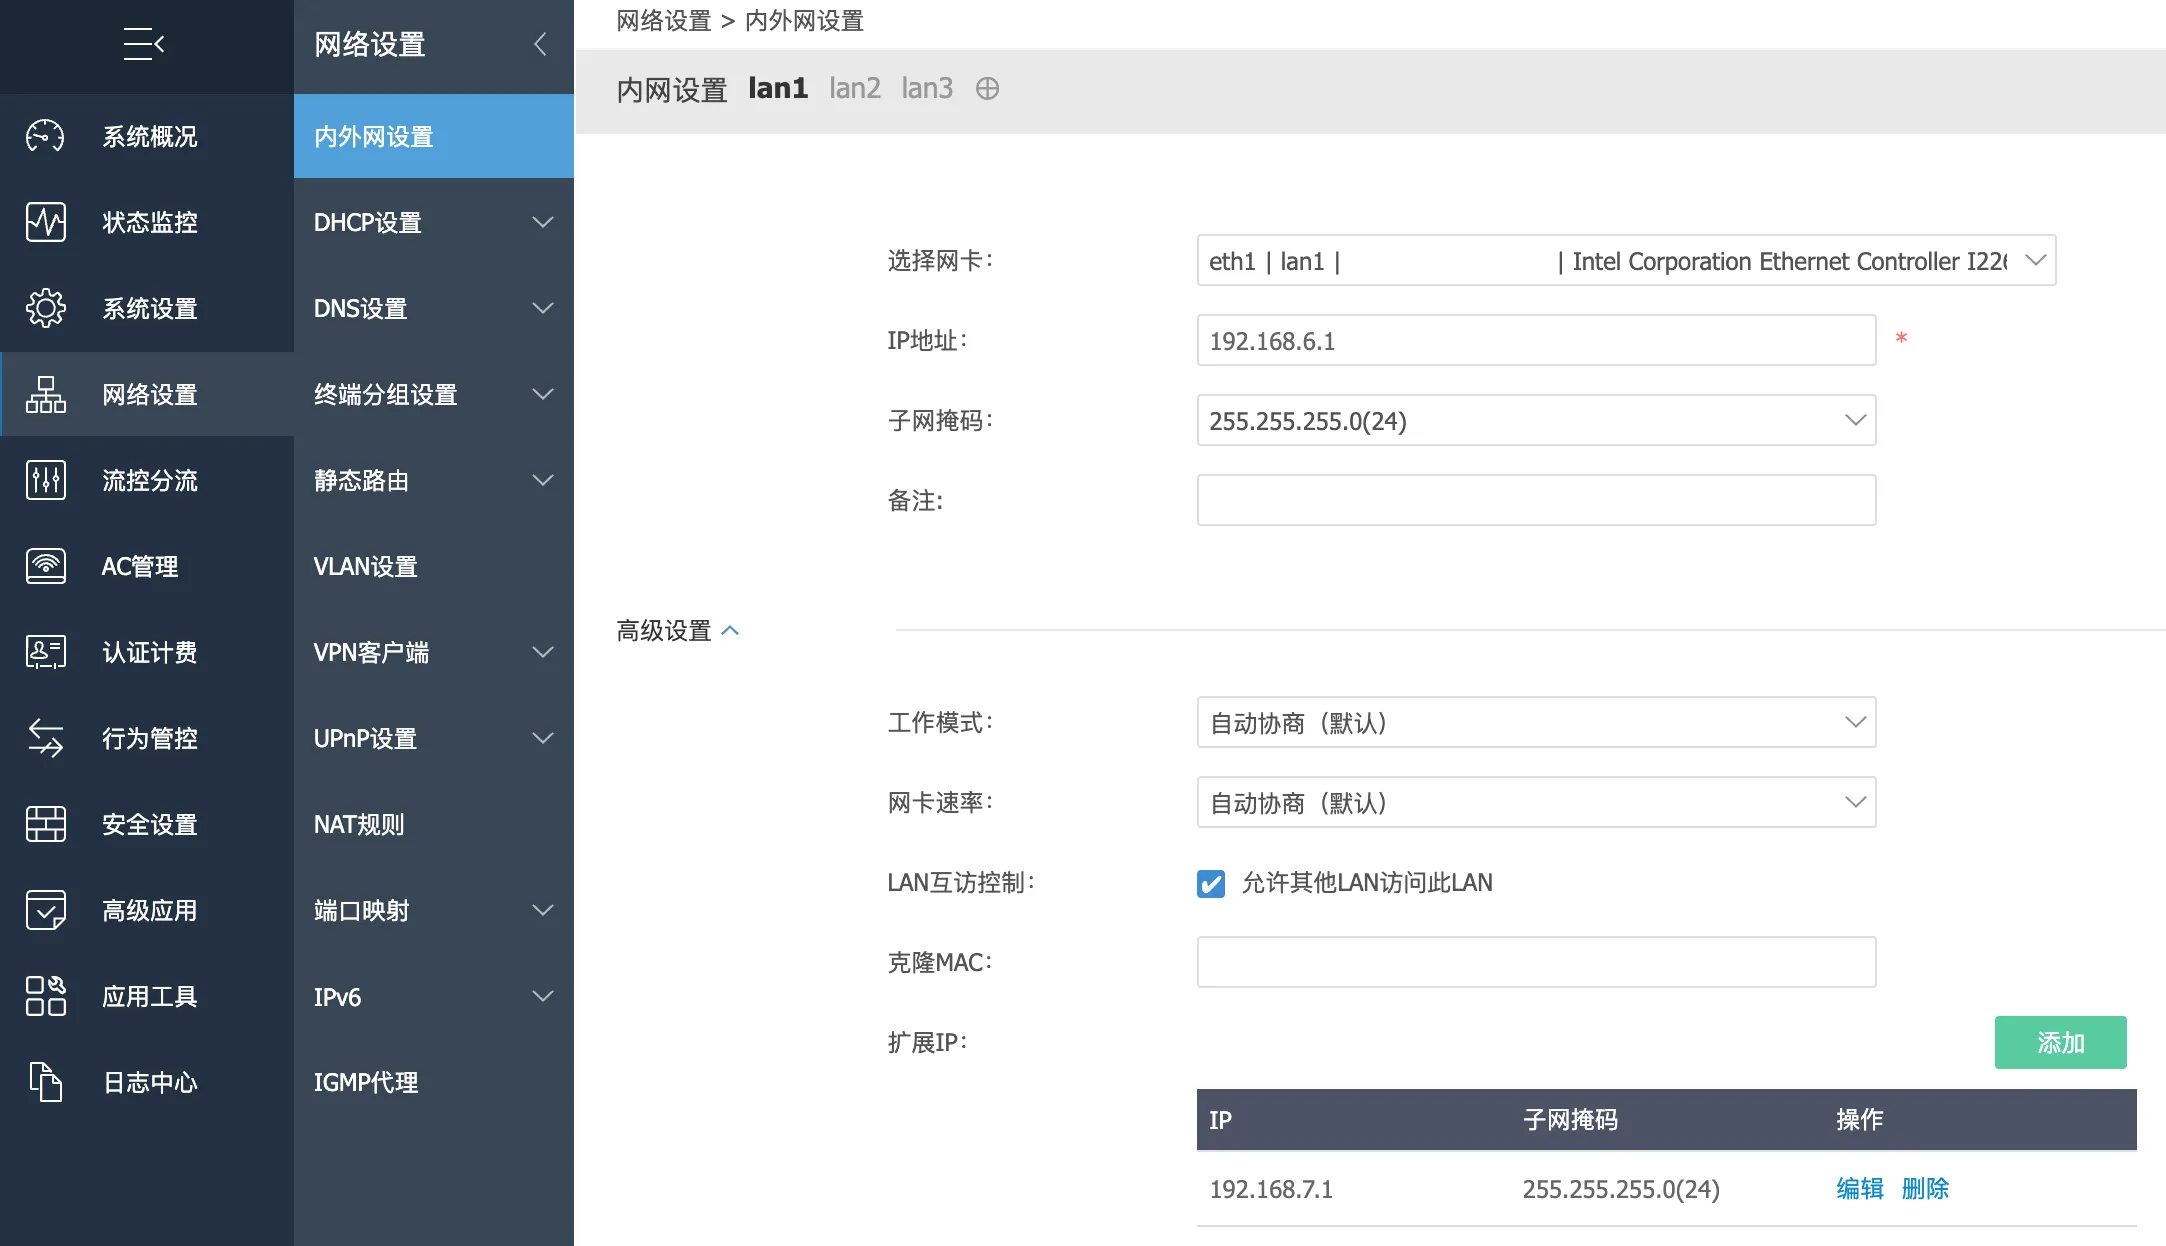
By default, my internal network used the 192.168.6.0/24 range. We need to add another subnet: 192.168.7.0/24.
I use an iKuai router. Here’s how to add a subnet with iKuai. If you use OpenWRT or another router OS, Google will have the answer.
Under iKuai, navigate to Network Settings > Internal/External Network Settings > lan1, and add an additional IP in the Advanced Settings section. Set it to 192.168.7.1 with a subnet mask of 255.255.255.0.
Next, add a DHCP configuration for the new 192.168.7.0/24 subnet.

Set the gateway to 192.168.7.2—the address we’ll assign to the bypass router shortly. Both Primary and Secondary DNS should also be set to 192.168.7.2, as DNS for that subnet is handled by the bypass router.
Debian Configuration
Unless otherwise stated, the following should be done on the bypass router machine.
IP Configuration
Edit Debian’s network settings by running sudo nano /etc/network/interfaces and updating the file as follows:
# This file describes the network interfaces available on your system
# and how to activate them. For more information, see interfaces(5).

source /etc/network/interfaces.d/*

# The loopback network interface
auto lo
iface lo inet loopback

# The primary network interface
allow-hotplug enp1s0
iface enp1s0 inet static
address 192.168.7.2
netmask 255.255.255.0
gateway 192.168.7.1
dns-nameservers 127.0.0.1
Notes:
enp1s0is my network device name—replace it with yours (ip awill list the names).- Here, we use a static IPv4 configuration, with the device’s address set at
192.168.7.2/24, the gateway pointed to192.168.7.1(the main router), and DNS initially set to a working DNS server. Change this to 127.0.0.1 once AdGuardHome is up, to avoid connectivity hiccups during setup.
To restart networking:
sudo systemctl restart networking.serviceBe aware: SSH may disconnect, as the IP changes. You’ll need to reconnect via the new IP, 192.168.7.2.
Check your config with:
ip aYou should see something like:
2: enp1s0: <BROADCAST,MULTICAST,UP,LOWER_UP> mtu 1500 qdisc fq_codel state UP group default qlen 1000
    link/ether 70:70:fc:00:e3:36 brd ff:ff:ff:ff:ff:ff
    inet 192.168.7.2/24 brd 192.168.7.255 scope global enp1s0
       valid_lft forever preferred_lft forever
...
Your device’s internal IP should now be 192.168.7.2/24.
Enable Traffic Forwarding
To qualify as a router/gateway, the device must have traffic forwarding enabled:
sudo echo "net.ipv4.ip_forward = 1" >> /etc/sysctl.conf
sudo sysctl -p
AdGuardHome Setup
Let’s discuss the DNS traffic flow:

When a client requests DNS resolution, AdGuardHome (listening on port 53) forwards the request upstream to Clash. Clash then routes DNS queries based on predefined rules: requests for domains in Mainland China go to domestic DNS, while others proxy through to public DNS servers abroad.
If Clash fails, AdGuardHome will fall back to domestic DNS servers directly (this is barely useful, since even if resolution succeeds, traffic must still pass through Clash).
Installing AdGuardHome
Run the following as root:
## Get latest stable release version
remote_ver=$(curl -sS https://api.github.com/repos/AdguardTeam/AdGuardHome/releases/latest | jq -r .tag_name | sed 's|v||' | grep -v "null"); echo $remote_ver

## Download latest version (ensure the previous step succeeded)
cd /tmp
wget -q --progress=bar:dot --show-progress -O "AdGuardHome_linux_amd64.tar.gz" "https://github.com/AdguardTeam/AdGuardHome/releases/download/v${remote_ver}/AdGuardHome_linux_amd64.tar.gz"

## Extract
tar --no-same-owner -xf "AdGuardHome_linux_amd64.tar.gz" --strip-components 2 --directory=.

## Install
install -ps AdGuardHome /usr/local/bin/adguardhome
Creating the Service
Create a work directory:
mkdir -p /var/lib/adguardhomeThen create /etc/systemd/system/adguardhome.service as follows (the config file will be /var/lib/adguardhome/AdGuardHome.yaml):
[Unit]
Description = Network-wide ads & trackers blocking DNS server.
Wants       = network-online.target mosdns.service
After       = network-online.target mosdns.service

[Service]
Type               = simple
Restart            = always
StartLimitInterval = 5
StartLimitBurst    = 10
ExecStart          = /usr/local/bin/adguardhome -w /var/lib/adguardhome
RestartSec         = 10

[Install]
WantedBy = multi-user.target
Save, then enable and start the service:
systemctl enable --now adguardhome.serviceTo view logs:
journalctl -efu adguardhome.serviceTo restart:
systemctl restart adguardhome.serviceInitial Configuration
Open http://192.168.7.2:3000 in your browser to perform initial setup. Keep the web management port as 3000 and set the DNS server port to 53.
In Settings > DNS Settings, set the upstream DNS server to the not-yet-configured Clash DNS at 127.0.0.1:1053. For fallback DNS servers, use a few domestic options like:
223.5.5.5
119.29.29.29
Remember to apply your changes. Set DNS service speed limit to 0 (unlimited) in DNS Service–Speed Limit.
To block ads, you can add rules in Filters–DNS Blacklist. I recommend the following two rule sets for mainland China:
easylist:  https://anti-ad.net/easylist.txt
half-life: https://adguard.yojigen.tech/HalfLifeList.txt
Clash Setup
Clash is responsible for DNS splitting (domestic/foreign) as well as proxying. Since the original Clash repo was deleted, the Mihomo project has taken its place.
Installing Clash (Mihomo)
Run these as root:
## Get current stable version
remote_ver=$(curl -sS https://api.github.com/repos/MetaCubeX/mihomo/releases/latest | jq -r .tag_name | sed 's|v||' | grep -v "null"); echo $remote_ver

## Download stable release
cd /tmp
wget -q --progress=bar:dot --show-progress -O "mihomo-linux-amd64-v${remote_ver}.gz" "https://github.com/MetaCubeX/mihomo/releases/download/v${remote_ver}/mihomo-linux-amd64-v${remote_ver}.gz"

## Decompress
gzip -d "mihomo-linux-amd64-v${remote_ver}.gz"

## Install
install -ps mihomo-linux-amd64-v${remote_ver} /usr/local/bin/clash
Creating the Service
Create the work directory:
mkdir -p /var/lib/clashCreate the clash user:
useradd -M -s /usr/sbin/nologin clashThen create /etc/systemd/system/clash.service. The config will reside at /var/lib/clash/config.yaml:
[Unit]
Description = Clash-Meta tproxy daemon.
Wants       = network-online.target
After       = network-online.target

[Service]
Environment   = PATH=/usr/local/sbin:/usr/local/bin:/usr/sbin:/usr/bin:/sbin:/b>
Type          = simple
User          = clash
Group         = clash

CapabilityBoundingSet = CAP_NET_ADMIN CAP_NET_BIND_SERVICE CAP_NET_RAW
AmbientCapabilities   = CAP_NET_ADMIN CAP_NET_BIND_SERVICE CAP_NET_RAW

Restart       = always
ExecStartPre  = +/usr/bin/bash /var/lib/clash/clean.sh
ExecStart     = clash -d /var/lib/clash
ExecStartPost = +/usr/bin/bash /var/lib/clash/iptables.sh

ExecStopPost  = +/usr/bin/bash /var/lib/clash/clean.sh
You’ll notice that the clash binary runs under the clash user—this helps distinguish traffic originating from Clash itself versus traffic forwarded by Clash.
Notably, we call iptables.sh and clean.sh during ExecStartPost and ExecStopPost to set/clear routing tables.
Their contents:
iptables.sh:
#!/usr/bin/env bash
set -ex

# ENABLE ipv4 forward
sysctl -w net.ipv4.ip_forward=1

# ROUTE RULES
ip rule add fwmark 666 lookup 666
ip route add local 0.0.0.0/0 dev lo table 666

# The 'clash' chain processes forwarded traffic
iptables -t mangle -N clash
# Traffic to private/reserved IPs is exempted
iptables -t mangle -A clash -d 0.0.0.0/8 -j RETURN
iptables -t mangle -A clash -d 127.0.0.0/8 -j RETURN
iptables -t mangle -A clash -d 10.0.0.0/8 -j RETURN
iptables -t mangle -A clash -d 172.16.0.0/12 -j RETURN
iptables -t mangle -A clash -d 192.168.0.0/16 -j RETURN
iptables -t mangle -A clash -d 169.254.0.0/16 -j RETURN
iptables -t mangle -A clash -d 224.0.0.0/4 -j RETURN
iptables -t mangle -A clash -d 240.0.0.0/4 -j RETURN

# All other traffic is redirected to port 7893 with mark
iptables -t mangle -A clash -p tcp -j TPROXY --on-port 7893 --tproxy-mark 666
iptables -t mangle -A clash -p udp -j TPROXY --on-port 7893 --tproxy-mark 666

# All traffic is handled by the clash chain
iptables -t mangle -A PREROUTING -j clash

# 'clash_local' chain processes traffic from the gateway itself
iptables -t mangle -N clash_local
# Skip local traffic
iptables -t mangle -A clash_local -d 0.0.0.0/8 -j RETURN
iptables -t mangle -A clash_local -d 127.0.0.0/8 -j RETURN
iptables -t mangle -A clash_local -d 10.0.0.0/8 -j RETURN
iptables -t mangle -A clash_local -d 172.16.0.0/12 -j RETURN
iptables -t mangle -A clash_local -d 192.168.0.0/16 -j RETURN
iptables -t mangle -A clash_local -d 169.254.0.0/16 -j RETURN
iptables -t mangle -A clash_local -d 224.0.0.0/4 -j RETURN
iptables -t mangle -A clash_local -d 240.0.0.0/4 -j RETURN

# Mark local source traffic
iptables -t mangle -A clash_local -p tcp -j MARK --set-mark 666
iptables -t mangle -A clash_local -p udp -j MARK --set-mark 666

# Exclude traffic from the clash process itself to prevent loops
iptables -t mangle -A OUTPUT -p tcp -m owner --uid-owner clash -j RETURN
iptables -t mangle -A OUTPUT -p udp -m owner --uid-owner clash -j RETURN

# Route all local output traffic through the clash_local chain
iptables -t mangle -A OUTPUT -j clash_local

# Fix ICMP (ping)
sysctl -w net.ipv4.conf.all.route_localnet=1
iptables -t nat -A PREROUTING -p icmp -d 198.18.0.0/16 -j DNAT --to-destination 127.0.0.1
clean.sh:
#!/usr/bin/env bash
set -ex

ip rule del fwmark 666 table 666 || true
ip route del local 0.0.0.0/0 dev lo table 666 || true

iptables -t nat -F
iptables -t nat -X
iptables -t mangle -F
iptables -t mangle -X clash || true
iptables -t mangle -X clash_local || true
Each step is annotated—feel free to ask ChatGPT for further detail if you’re curious.
Clash Configuration File
Clash config files are generally delivered by your provider; they should be YAML format. Save it as /var/lib/clash/config.yaml and be sure to update these key sections:
tproxy-port: 7893   # iptables.sh directs all traffic to port 7893
mixed-port: 7890
allow-lan: true
find-process-mode: off
bind-address: "*"
mode: rule
log-level: debug
ipv6: false # No IPv6 proxying

external-controller: 0.0.0.0:9090
secret: # UI password
external-ui: ui
external-ui-name: xd
external-ui-url: https://github.com/MetaCubeX/metacubexd/archive/refs/heads/gh-pages.zip
unified-delay: true
tcp-concurrent: true
experimental:
  sniff-tls-sni: true
geodata-mode: true
geodata-loader: standard
geox-url:
  geoip: https://testingcf.jsdelivr.net/gh/MetaCubeX/meta-rules-dat@release/geoip.dat
  geosite: https://testingcf.jsdelivr.net/gh/MetaCubeX/meta-rules-dat@release/geosite.dat
  mmdb: https://testingcf.jsdelivr.net/gh/MetaCubeX/meta-rules-dat@release/country.mmdb
profile:
  tracing: true
  store-selected: true
  store-fake-ip: true
sniffer:
  enable: true
  parse-pure-ip: true
  override-destination: true

dns:
  enable: true
  ipv6: false
  listen: 0.0.0.0:1053 # DNS listening port
  use-hosts: true
  enhanced-mode: fake-ip
  default-nameserver:
    - 223.5.5.5
    - 119.29.29.29
  nameserver:
    - https://doh.pub/dns-query
    - tls://dot.pub
    - tls://dns.alidns.com
    - https://dns.alidns.com/dns-query
  fallback:
    - https://dns.cloudflare.com/dns-query
    - tls://dns.google:853
    - https://1.1.1.1/dns-query
    - tls://1.1.1.1:853
    - tls://8.8.8.8:853
  fake-ip-filter:
    - '+.lan'
    - '+.cluster.local'
    - 'time.*.com'
    - 'time.*.gov'
    - 'time.*.edu.cn'
    - 'time.*.apple.com'
    - 'ntp.*.com'
    - 'localhost.ptlogin2.qq.com'
    - '+.ntp.org.cn'
    - '+.pool.ntp.org'
    - '+.localhost'
  fallback-filter:
    geoip: true
    geoip-code: CN
    geosite:
      - gfw
    ipcidr:
      - 224.0.0.0/4
      - 240.0.0.0/4
      - 169.254.0.0/16
      - 0.0.0.0/8
      - 127.0.0.1/32
    domain:
      - '+.google.com'
      - '+.facebook.com'
      - '+.youtube.com'

proxies:  # Your proxy nodes, groups, and rules go here
proxy-groups:
rules:
A note on the DNS section: DNS is split into two groups:
nameserverfor domestic DNS providers,fallbackfor foreign ones.
The fallback-filter determines when to use fallback DNS:
- If a result doesn’t hit the China IP region, fallback is used.
- gfw/geosite rules force fallback for matched domains.
- If the returned IP is from a reserved/polluted block, fallback is used.
- Domains in the domain list go straight to fallback.
This covers DNS splitting.
Supporting Files
Clash requires several supporting files before startup:
cd /var/lib/clash
wget -q --progress=bar:dot --show-progress -O country.mmdb https://github.com/MetaCubeX/meta-rules-dat/releases/download/latest/country.mmdb
wget -q --progress=bar:dot --show-progress -O geosite.dat  https://github.com/MetaCubeX/meta-rules-dat/releases/download/latest/geosite.dat
wget -q --progress=bar:dot --show-progress -O GeoIP.dat    https://github.com/MetaCubeX/meta-rules-dat/releases/download/latest/geoip.dat

mkdir -p ui
cd ui
wget -q --progress=bar:dot --show-progress -O xd.zip https://github.com/MetaCubeX/metacubexd/archive/refs/heads/gh-pages.zip
unzip -oqq xd.zip
mv metacubexd-gh-pages xd
Your /var/lib/clash directory should look like:
/var/lib/clash
├── clean.sh
├── config.yaml
├── country.mmdb
├── GeoIP.dat
├── geosite.dat
├── iptables.sh
└── ui
Since Clash runs as the clash user, ensure correct ownership:
chown -R clash:clash /var/lib/clashAnd make iptables.sh and clean.sh executable:
chmod +x iptables.sh
chmod +x clean.sh
Starting the Service
Once everything is configured, enable and start the clash service:
systemctl enable --now clash.serviceTo view logs:
journalctl -efu clash.serviceTo access the web UI: http://192.168.7.2:9090/ui/xd
The web UI configuration should be familiar. Once things are working, set your own DNS to 127.0.0.1 (as mentioned before) and point your internal devices’ gateway and DNS to 192.168.7.2.
Port Forwarding
If you’ve set up port forwarding on your main router, but the destination device’s gateway is your bypass router, port forwarding won’t work out of the box. See Fixing Bypass Router Port Forwarding for a solution.